+44 (0) 115 9248666

Welcome to White Tree Fabrics   
Login / Register   
per page
Items 1 to 10 of 52 total
1 2 3 4 5

Louise's Vogue Floral Dress

Wednesday, 22 October 2025 10:45:15 Europe/London

Not every make is a roaring success. However, when a blogger has worked so hard on a project, hoping for good results but not quite getting what they expected, we're still going to share it with you. Every dressmaking project helps a sewer to expand their experience and knowledge and hopefully what they have encountered on their sewing journey might help someone else further down the line.  This time, it was a sizing issue on a dress pattern.

Here's what happened when Louise attempted Vogue's 8764 dress.

Oh how I wish this dress had turned out better. The pattern, V8764, is for a 3/4 length sleeve dress with an a-line skirt, invisible back zipper, top-stitching and lovely little V detail at the neckline – I love the illustration on the envelope, it looks so elegant! Such a great looking dress for work, tea parties and trips to the shops don’t you think?

louise tilda dress

The fabric I used is a Tilda Martine cotton in blue/grey from White Tree Fabrics – you can find it here.  It’s a lovely cotton fabric to sew with – very soft and flowy and doesn’t fray. I love the little ditsy floral print too, it’s very dainty and perfect for a tea dress like this. The dress also has a lining in the bodice and the skirt making it feel like a very luxurious garment. I’ve never sewn a proper lining before so it was great to learn how it’s done!

Now, here’s my problem with this pattern – whilst it’s full of loveliness, it’s also wayyyy too big for little people like me. I cut the pattern to the smallest size and, due to all the seams and lining and top-stitching, didn’t find myself with a lot of opportunity for fitting until it was too late! The length isn’t a problem to alter and the waist fits ok (perhaps adding some belt loops would solve this further!) but that neckline. I just cannot deal with that neckline! Maybe it’s because I’m quite petite, but it’s so wide on me and gapes horrendously at the front. It’s making me a bit sad because I do really like the dress and the fabric – if the top was more fitted/had a higher neck then I dare say it’d become one of my go-to dresses. I’m not sure I can edit it without re-cutting my pattern pieces now that I’ve attached the lining and zip and top-stitched around the neck. What do you reckon?


That’s not to say that this dress will turn out badly for everyone though – I did a quick online search and found some great examples of people who have done a much better job – take a look!


  • My absolute fave – fellow White Tree Blogger Jess’ broderie anglaise version at Jessthetics.
  • This lovely denim-y version at The Thrifty Squirrels.
  • A gorgeous lined version at The Sew Weekly.
  • In double knit at SewMuchKnitting.
  • Red jersey at ReadyThreadSew.
  • Lined with vintage kimono fabric at Fond Flow.

We hope Louise finds time to re-visit the project and salvage her dress! It looks beautiful and elegant, just such a shame about the neckline and sizing. We wonder how others have found sizing on Vogue patterns to be? Feel free to contact us about it, we'd love to hear from you.


Comments | Posted in Bloggers Creations By Lisa Washington

A Tilda-Miette Skirt – It’s a wrap!

Tuesday, 7 October 2025 16:03:36 Europe/London

Tilda Cotton is proving to be well loved by bloggers and customers alike. Beautiful prints and very sew-friendly material combine to make this fabric a favourite to sew with.  Well, what happens when you pair it with one of the most popular skirt sewing patterns around at the moment? Charlie found out - here's her fabulous make!

Have you heard about Tilda fabric? I hope you have, because it’s awesome! Tilda fabric was actually the first fabric I bought after I got my sewing machine (I bought a pack of fat quarters on Amazon because I had no idea how to shop fabric back then). This year I used up all my Tilda leftover fabric for making my sewing machine cover. When White Tree Fabrics asked me to join their blogging team I was super excited that they had Tilda fabric in stock. All I had to do was find the right pattern to go with it.

White Tree Fabrics specialise in dressmaking fabrics, haberdashery and patterns.They have all Tilly & The Buttons patterns in stock and I thought why not add the Miette to my Tilly pattern collection?

The fabric:

After forcing the Mr. to help me pick a nice Tilda cotton, I finally went for the Ella Slate Blue. All Tilda prints are very romantic in style and since this one also looked a bit like washed denim I thought it would be perfect for a skirt. The fabric quality is amazing, it’s quite heavy-weight and very very smooth. It was really nice to sew with.  I did my best to match the pattern and have to say that I did quite well. You can barely see the pockets!

The pattern:

Now let’s talk about the pattern! I was a bit worried that the Miette might not be my cup of tea. I’m not a big 1970′s fan and those pockets just seemed to scream 70′s to me! As I had more than enough fabric, I decided to make the version with the pockets anyway.

Furthermore, I was also worried that the A-line shape of the skirt might not fall softly and therefore look a bit frumpy on myself (all this was suddenly going through my head as I was cutting out the fabric and I was starting to doubt my decision).

The pattern itself was really straightforward and the instructions so clear and detailed that the skirt came together without any problems in only a couple of hours. I made a size 3 which I did not grade up to a larger size at the hips – it’s a wrap skirt, so I though I would be fine.

I overlocked all seams with off-white thread and pressed them open. I hemmed the skirt with my machine, about 1.5cm from the edge, after folding it over twice.

The skirt doesn’t need any zips or buttons, it simply closes by tying it in the front. There is a tiny hole in the waistband (see pic below) where you pull one tie through and then join it with the other one in the front to make a bow. I still haven’t figured out how to tie it so it looks like a nice bow, not just like a crooked propeller. The ties have a nice length, not too long and not too short.

The fit:

I really was pleasantly surprised by the fit of the Miette Skirt. It didn’t look 1970′s frumpy at all. The skirt drapes quite beautifully and you can barely see the large pockets, which are super practical (hiding large smartphones)!

Overall the skirt fits nicely and the back panels overlap enough to not risk flashing people. You only have to be careful when you come back from the ladies that you pull everything back in place before you step out of the door. It’s worth double checking in the mirror! (Don’t ask me how I know this!)

I quite like the pattern and will probably make the skirt again, maybe even in a softer fabric and without the pockets. The only thing I’m not so happy with is the big bow, as it is not too flattering sitting right on top of your tummy and I also noticed that I can’t wear my lovely pussy bow blouses with it   Two propellers in the front looks just veeery awkward. Too bad!

When I ordered my fabric I also asked the lovely White Tree Fabric team to add some Tilda ribbon to the mix:

It’s the Sally Blue Green Tilda ribbon. I wanted to add it onto the skirt hem or waistband, but although it’s basically the same print (if you look closely you can see it) it just looked really odd on the skirt, so I had to discard that idea. Luckily, I have a bit of the fabric left and will make a cushion cover with it and will use the pretty trim to embellish it! (You can look forward to more Tilda action!)

White Tree Fabrics just annouced that they now have all the By Hand London patterns in stock, whoop, whoop! Guess what I will be making next? I’m really looking forward to my next White Tree Fabrics make and already started planning.

What are your thoughts on the Miette Skirt? Have you made it? Are you planning to?

If you'd like to try this skirt for yourself, here's what you'll need:

Shopping list - (click to view item).

Tilda Cotton Fabric - Ella Slate Blue

Tilly and the Buttons Miette Skirt Sewing Pattern

Co-ordinating Thread

Happy sewing! We'd love to see your makes - if you would like to share any makes made with White Tree products, drop us a line and we'll reward you with a special discount code.


Comments | Posted in Bloggers Creations By Lisa Washington

Aneria's Birthday Dress

Tuesday, 7 October 2025 15:08:13 Europe/London

Aneira is our Wales based blogger and she recently celebrated a birthday. Instead of hitting the high street looking for something special to wear on her birthday outings - Aneira made her own dress! We think it's gorgeous and we're happy to share this one with you.

I’m pretty sure I haven’t mentioned this yet but I’ve teamed up with the lovely people at White Tree Fabrics to become one of their bloggers. This is so exciting for me as it gives me a reason to sew and blog lots of dress patterns, on a semi regular basis.

I finished the above dress the weekend before last which also happened to be my birthday weekend, so I’ve aptly named it the birthday dress. I already love it so, so much and will definitely be using the pattern again. Next time, though, I think I’ll make it slightly shorter and size down a bit as it’s slightly too big. I might also lengthen the straps a bit and bring down the neckline.

White Tree Fabrics kindly supplied me with the fabric, pattern and notions of my choice and I sat down and made it. I chose the Vogue 8723 pattern because I liked the high neckline and thick straps and I don’t have anything like this in my wardrobe already. Although I loved the pattern (it reminds me a bit of the By Hand London Flora dress), gathering the skirt was probably the worst part. I’m a pleats kind of girl, so I suppose that gathering will always seem more fiddly. I also had to put in an extra panel in the sides of the dress as the fabric wasn’t wide enough but it turned out fine in the end.

I chose the Tilda Martine fabric as it just appealed to me. I have such a love for florals and the fabric is so lovely that these photos don’t really do it justice.

I’m looking forward to trying out some more patterns in the future!

We hope Aneria's dress has inspired you to have a go at creating your own.  There's a few things you will need, but you can create this exact dress for around £45.00. Not only will your be unique, it will be the perfect, custom fit. Once you have the pattern, you can create many different versions in all different types of fabric. Why not give it a go?

Shopping list - (click on an item to view)

Tilda Cotton Fabric - Martine, BlueGrey

Vogue Sewing Pattern V8723

Co-ordinating Thread

Transparent concealed Zip

Happy Sewing!

If you feel like sharing your completed projects with us, then please contact us and we'll reward you with a discount code.

Comments | Posted in Bloggers Creations By Lisa Washington

Jo's Chiffon Wedding Guest Dress

Tuesday, 30 September 2025 16:01:07 Europe/London

When Jo decided to create her own dress to wear to a wedding, she decided on chiffon as the main fabric for the dress. Chiffon is a sheer, floaty fabric which can sometimes mean it's a labour of love to sew with. However, the results are so rewarding when you have a gorgeous, light, flowing dress at the end of your project, as Jo discovered. Here's how her make went!

As many of our lovely blog readers are aware, we have joined forces with the fabulous White Tree Fabrics and become part of their blogging team.  So here is my first project post. I have to admit this project has pushed me to the max and almost had me in tears when I had a very close call with an iron. 

I chose a wine chiffon with a red lining for my dress and I seem to be loving the colour red at the moment and it can be worn in any season.

So here’s a link to my vogue pattern and how it's supposed to look, and as many people will know I like to chop and change things and alter and embellish. 

So first steps of using a pattern that isn't mine is to read the instructions, they are there for a reason. They tell you how lay out your pieces on your fabrics to make sure they all fit with out wasting fabric and give you a step by step guide on how not to mess up your dress. Then its time to cut out. 

This is where my first alterations to the pattern happened. I wanted the lining of the skirt to be shorter so the full length of the chiffon is shear. This involved carefully folding the skirt panels to the correct length, another idea would have been to trace over the pattern but adjusting the length.

Chiffon Dress 1

Now for the sewing, I started with the skirt of the dress. (Yes I did read the instructions, but I also tend to muddle them up a bit when I start, and it worked for me, but if you are not an experienced sewer then please don't risk not doing it properly) 

Anyone who has ever worked with chiffon will know that you need to invest in pins, new pins that are sharp and lots of them. Any blunt pins will cause the fabric to pull and pucker. Every time this happens, somewhere a fairy drops done dead. Just kidding, but it is heartbreaking to watch. 

Here's some pictures of the lots and lots of pinning!


Once I had sewn the seams of the skirt I then did the same for the lining of the skirt. 

I then decided to make the elasticated waist of the dress a feature of the dress instead of hiding it away. So I used a thick black elastic that I cleverly recycled from an old pair of trousers that I no longer wear. I attached this to the skirt with a zigzag stitch, stretching the elastic as I sewed to create a gathered waist. 

The skirt also has a slit up the left leg to add a cheeky bit of sex appeal.

After a few days off sewing due to crazy dreams of pins falling from the sky, I realised I only had two evenings left after very busy work shifts to complete my dress. My skirt needed a top, so for this bit I followed the instructions for the front of the dress, attaching the lining to the chiffon and the triangle panel in the centre. 

I then stupidly decided to press the top without checking the temperature of the iron, the lining melted in a second and I wanted to cry. With quick thinking I sewed the burn hole together and luckily it is not noticeable through the chiffon. Panic over!

I then hemmed around the bust of the top to give a neat finish. I never ironed the dress again until it was completely finished.

The back of the dress I chose not to add the triangle shaped panel that was supposed to be gathered into the back. I attached the top to the skirt to create my dress, but this wasn't enough, there was something missing, it needed something else. So out came the large glass of red and my box of tricks and the embroidery began.

And now the finished garment, which I wore to a friends wedding over the weekend and I got some great feed back. This dress was totally worth all the stress of pinning and nearly burning and a very slippery hem that would not do what I wanted, but I got there and the fabric felt and looked fantastic. I never did iron the dress again, I was far too scared and had to get my mom to do it for me. I also had time to make a cheeky pair of matching earrings, however, I rushed out of the house and forgot to wear them with the dress. I will have to find another occasion to wear the outfit again.

We think Jo's dress is so pretty and feminine and best of all it's a one off, custom fit, handmade beauty complete with hand beading! We hope Jo has inspired you to have a go at making something like this yourself. Here's what you need:

The Sewing Pattern is ► here.

Find the red/wine chiffon ► here

You'll also need the lining, which is ► here.

Co-ordinating threads available ► here.

Beads are available ► here

Total supplies cost: approx £43.00 (in VAT & free delivery).


0 Comments | Posted in Bloggers Creations By Lisa Washington

Amanda's Lace Mathilde Blouse

Tuesday, 23 September 2025 13:01:43 Europe/London

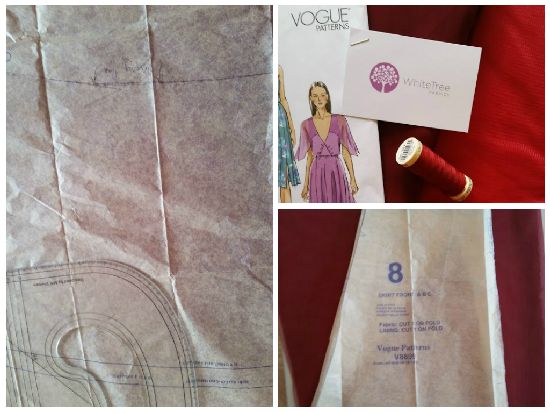
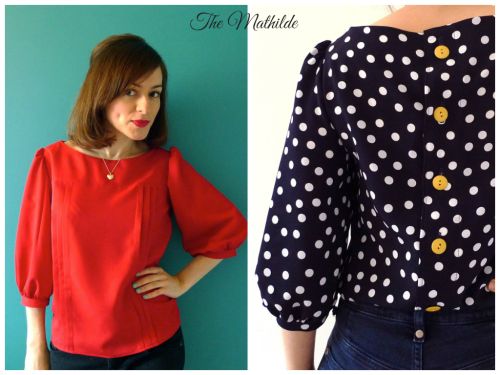
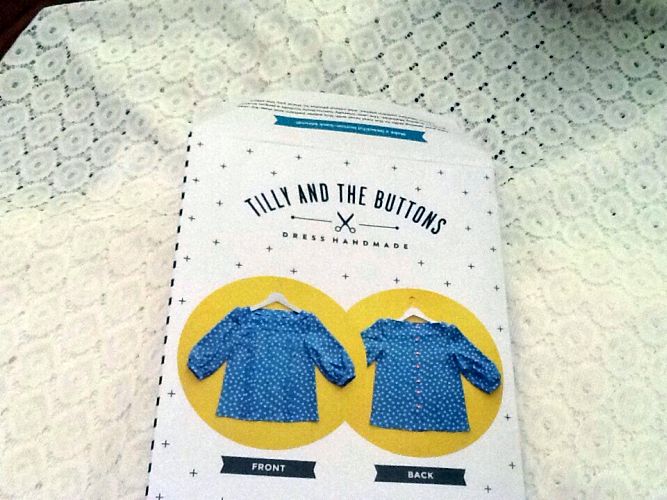
Just in case you weren't aware, WhiteTree fabrics are now proud stockists of Tilly and the Buttons sewing patterns. Available in store, we have Coco, Miette & Mathilde as well as our very special offer - £35.00 for the complete collection (saving you £2.50 plus we offer free P+P). These patterns are so popular because Tilly's designs mix vintage with the contemporary and all her sewing patterns are suitable for beginners and skilled sewers alike. They're also very user friendly, helping you to achieve great results.

Tilly and the Buttons Mathilde

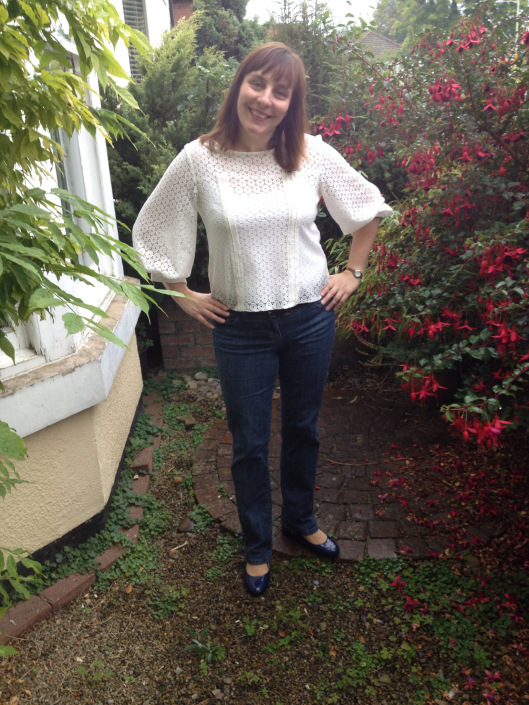
Our blogger Amanda has tried and tested the Mathilde and used some of our lovely circle lace to create a gorgeous lace blouse, which we love. 

Over to Amanda!

The Mathilde

The lace Mathilde

My latest blog post for White Tree Fabrics is The Mathilde from the lovely Tilly and the Buttons.
As I am also known as The Wonky Sewer I had to try this blouse in circle geometric stretch lace to hide my wonkiness!

Tilly and the Buttons mathilde

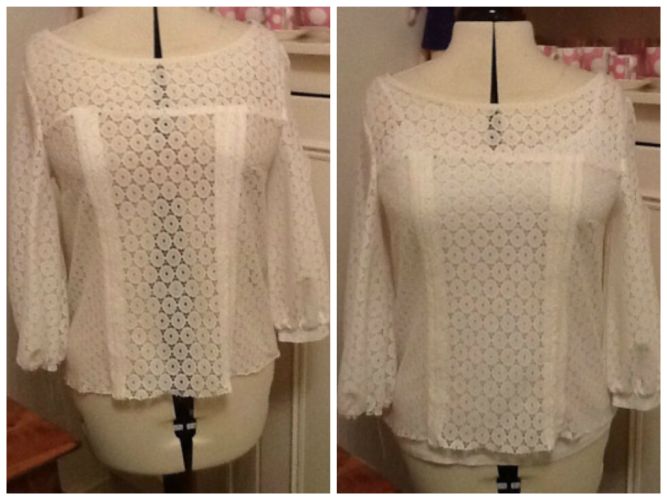
The pattern is lovely quality paper and I wondered if patterns made from this would still form around my mannequin….they did and I cut out my pattern to the exact fit of my mannequin -Janibob.

I decided to still make the blouse in the same style with a button back even with the stretch in the lace. It was a nice blouse to sew and I liked the pin tucks although I am not sure they are my best work and I ended up stitching them down because the lace would not iron flat.

Work in progress....the blouse with and without a white vest top:

The lace mathilde

Rather than line the lace I just wore a white vest underneath it.

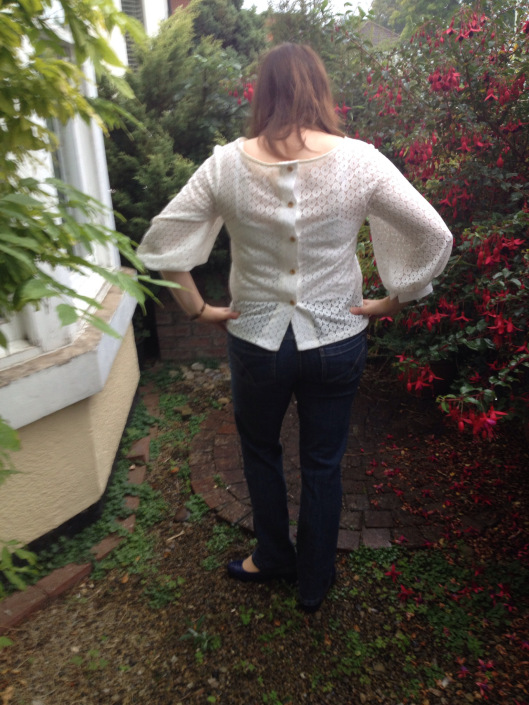
I tried the blouse on and I could get it on over my head so decided to just sew the wooden buttons on through the placket and hold the blouse together. After seeing the photos of it on me I think I might put a few more stitches in to make it look less baggy!

The sleeves are nice and baggy and I made a feature of the edge of the cuff sewing them so there is a triangle space where they meet. In the photos one of the sleeve is all tucked up but I can assure you they do match!

Tilly and the buttons mathilde

I think the neck is also quite big, so if you plan to make a lace version I would make sure you are careful with your neckline!
I do love it and it is a lovely style to wear….really comfortable. I wore it with my jeans for Jeans for Genes day today. I would like to try it in cotton next and do some perfect pin tucks!

If you fancy having a go at creating this lovely blouse for yourself, here's what you'll need:

Tilly and the Buttons Mathilde sewing pattern ► here.
Circle Geometric lace, available in Black, Ivory, Green and Blue ►  here.
Some lovely buttons for the back ► here.
Essential sewing thread 100m, 250, 500m & 1000m reels ► here.


Comments | Posted in Bloggers Creations By Lisa Washington

Simona's Autumn Wrap top

Friday, 19 September 2025 14:08:13 Europe/London

We love this latest blogger make, which is perfect for Autumn. It's long sleeved, with a wrap front and it looks quite warm and cosy! Simona made this using our ingenious 2-in-1 bonded lace; a fantastic fabric that features lace fixed to a satin background so that there is no need for a separate lining. We'll let Simona do the talking about how easy the fabric was to work with.....

For my first WhiteTree Fabrics blog project  I chose to  make a top I have seen on the blogosphere some time ago and just fell in love with it.  It is Vogue 8926 and I used the black satin bonded lace that WhiteTree have on offer. Have you seen Lucie’s Honeymoon bag for which she used the white version of this fabric? Exquisite! That’s what I say!

WhiteTree Fabrics sent me everything from the fabric and pattern to the notions such as thread and bias tape.  I decided to make View C. I was hopping to use it as a jacket! The fabric was more difficult to cut than to actually sew it up! I think in the future, when I use this type of fabric I will cut each piece on single layer, to be more accurate when cutting rather than double layer. Think that using my new heavy tailor scissors did not help the issue either as I am not used to cutting with such a heavy pair!  And I think saving time will have to be sacrificed for accuracy!

It did not take me long to put it together think it was about 5 to 6 hours from tracing my size to finished garment!  In the end I had to make my own bias tape, because when I told Lisa about what bias tape I need, gave her the wrong dimension and it was way too thin for my project. Oops!  But it did not take me long to make it, especially since I have the Simplicity Bias Tape  Maker , which I love using all the time.  

This pattern is a perfect one for autumn!  Sewing with this fabric is a dream, especially after having a bit of difficulty cutting it in the first place.  I did not use the instructions, other than checking I am adding the bias tape correctly.  And I am thinking of making it again for an evening outfit, maybe silk or satin!  Not sure which one yet!

The project did not pose many problems and  I believe even a beginner will make this in no time! I decided to make two openings for the belt to go through, one on both sides , just so I can close it both ways and because I was to lazy to actually do one side and then check and do the other. Just wanted to save me the trouble of having to use the unpick! It would have been a nightmare unpicking stretch stitch – black tread on black fabric?! Don’t even want to think about it. 


Fancy having a go at something like this yourself? Here's what you'll need!

Find the sewing pattern ► here.
2-in-1 bonded lace is ►  here
Black thread available ► here.
Bias Binding link is ► here

Comments | Posted in Bloggers Creations By Lisa Washington

Meet our Bloggers - Simona

Friday, 19 September 2025 12:30:15 Europe/London

WhiteTree fabrics are delighted to welcome Simona to the WhiteTree blogging team.

Simona

Simona hails from Bolton and is in her early 30s – and she loves sewing!

As a child she loved drawing clothing and still has a few drawings from then (the 90's). Simona just loved clothes and dreamed of one day knowing how to make them. She even made a few clothes for her dolls as child.

When she came to UK some time ago, she was gifted a sewing machine. Ever since her first stitch, she just loved sewing. Simona says; "Making your own clothes often comes from the desire to have unique garments that you didn’t pay an arm and a leg for and the need to learn new things and keep yourself entertained. You also feel great when a project comes together."

Simona started her blog,  Sewing Adventures in the Attick as an outlet for her to keep track of self-made projects, to improve her English and to share her passion for  sewing with others.  She also loves the support and lovely comments her readers leave for her.

Simona loves fabrics and patterns. Every time she ends up in a fabric shop (there is one close to her house),  she cannot help touching the fabrics and grabbing a few to add to her stash. Simona’s mum even told her that at this rate she will end up opening her own fabric shop!  No chance for that, because she cannot let the fabric go that easily. It will all become something she made.....one day!

You can stay up to date with Simona's sewing adventures over at her blog.


Comments | Posted in WhiteTree Blog Team By Lisa Washington

Louise's Red Lace Dress

Friday, 12 September 2025 13:02:21 Europe/London

This next blogger project was truly a labour of love for Louise. She decided to select a project that involved sewing with lace. As she isn't used to working with this type of fabric, the project took her a little longer than usual but the results were spectacular. We are in awe of this beautiful dress, which has been made to wear to a wedding! Anyway, over to Louise.....


I am pleased to finally be showing you my first project made for the White Tree Fabrics blogger network.  I say ‘finally’ because this dress has taken a very long time to plan and make.  I first ordered the samples mid-June!  The actual sewing spanned three weeks, which is extremely long by my standards.

White Tree Fabrics have an amazing range of ‘fancy fabrics’ – particularly lace.  I knew that I wanted to make a lace dress – in fact, I’ve been wanting to make one for about four years!  As I have limited experience of working with lace, I ordered a large selection of samples of the different types of lace so that I could see how they differ in appearance and feel.  I also ordered samples of duchess satin, lightweight satin and organdie to see how well they might complement the lace.  All of these samples I ordered in red, my favourite colour.

I chose a combination which I was pretty sure I liked (heavy corded laceduchess satin andlightweight satin), but I had a last-minute change of heart and thought it might be better for me to make a green lace dress instead.  So I asked for more samples to be sent out, this time in green, but when they arrived I couldn’t get the right combination of greens so it was back to plan A, and I was finally ready to order!

I knew from the start that I was going to use Simplicity Amazing Fit 1606 for my pattern.  I have adored wearing my blue and white halter neck version, and the pattern includes a variation specifically designed for a dress with a lace overlay.  However, I wanted to use the scallop edge of the lace for the hem of the skirt, which meant I wouldn’t be able to use the skirt pattern for this dress – instead I needed something with a straight hem.  Looking through my patterns I came across New Look 6143, which also includes a variation for a lace overlay dress and the skirt is pleated rather than circular.  The hemline wasn’t 100% straight, but I could just about get away with it as the curve was very slight.

I set about cutting into my lace fabric, which I’ll admit I was too terrified to prewash in case I ruined it, so this dress will have to be dry clean only!  I had to cut it all on the crosswise grain, so that my hemline could be the scalloped edge of the lace.  If you ever want to cut through corded lace, you will need really sharp and sturdy shears.  I had a brand new pair (with red handles, yay!), and I was glad of them but it was still tough-going.  Perhaps a rotary cutter with a cutting board would be a better option for corded lace?

My next challenge was – how on earth do I transfer the pattern markings to the lace?  Notches weren’t going to show and I couldn’t draw on it… it had to be tailor tacks.  Gah I hate tailor tacks.  They take forever and they feel messy and fussy.  Still, it seemed like the only way to mark the darts properly.

Now, call me a fool because it was only at this point, after having cut the lace, that I gave consideration to seam finishes.  I guess I had just presumed I’d do French seams where possible, but when I practised with some scraps it didn’t look great.  Because the lace has such an open weave you could see the seam from the outside, and the French seam was particularly noticeable because of the number of layers of fabric in the seam.

I searched the internet for advice on how to seam lace, and came across a technique called ‘applique seams’.  Oh my word!  Basically applique seams are where you match up the lace motifs and overlap them exactly, and stitch one on top of the other with a zigzag stitch and then carefully trim around the motifs to create an invisible seam.  This discovery threw me into a total panic because I had already cut my lace out with the standard seam allowance, rather than a whole load of extra for matching-up and overlapping exactly.  However, I started to calm down when I realised that the lace I was working with didn’t have a series of isolated motifs, instead it was a continuous pattern with continuous cording, and therefore applique seams would not be ‘applicable’ (haha) in this case.  Phew!

I still had to decide on a seam finish, though.  After trying a few different options, I settled for simply pressing apart and trimming and leaving it at that.  The lace doesn’t fray, and any other seam finish was too visible.  This is a special occasion dress, so I knew I didn’t need to worry about the seam finishes being super-robust for everyday wear and repeated washing.

The next tricky part was the actual sewing.  Sewing over the cords meant that the line of stitching wasn’t 100% straight; where the needle hit the corded bits it went a little wonky (demonstrated below with white stitching on a scrap).  I adjusted the stitch length to a slightly longer stitch and decided to just wing it… after all it was only irregular in extreme close-up and it wasn’t going to affect the bigger picture.

Top left: Fabrics which arrived beautifully packaged.
Top right: Sample line of stitching over the cords.
Centre: Chevron effect of the lace (double layer)
Bottom left: Marking darts with tailor tacks and glass headed pins
Bottom right: Princess seams of the bodice overlay.

Once I’d gotten over these initial hurdles, sewing the dress was straightforward for a little while.  I got my lace bodice overlay sewn up easily, and then made the strapless bodice underneath with the duchess satin, lined with lightweight satin and boned with black rigilene boning from Boyes.  I then started on the skirt, which has 8 box pleats.  The New Look pattern didn’t advise to sew the pleats in the overlay and the skirt together as one, but instead to do each separately.  I followed the instructions but I should have trusted my instincts and sewn them together so that the overlay and skirt hung together perfectly.  When I had made the skirt and the overlay, I attached them to the dress…and hated it.
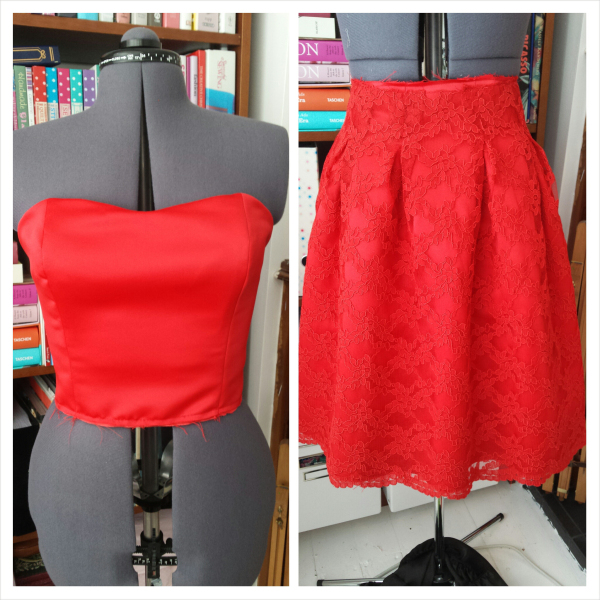
Red Lace Dress

 
Left: Strapless, boned satin bodice
Right: Satin pleated skirt with lace pleated overlay

It wasn’t hanging correctly at all due to the pleats in the overlay sitting on top of the pleats in the satin.  In addition to this, the satin is so thick and ‘springy’ that it didn’t respond well to being pleated, and stuck out in a rather unflattering manner.  I was crestfallen and wasn’t sure what to do.  My options were to:

a) stick with it but be unhappy – but I couldn’t go with this option.  This dress is supposed to be a testament to my sewing and something very special that I feel proud to wear.  How could I wear it if I was unhappy with it?
b) scrap the skirt and make a new one with extra fabric – the thrifty part of my brain wouldn’t allow me to do this.  Wasting that amount of lace and satin would be a sin.
c) unpick the pleats in both skirts and try sewing them together as one or
d) unpick the pleats in both skirts and gather them instead

 So it was either C or D, and let me tell you I’d had enough of pleats after sewing 16 of them, so I opted for gathering, and if it wasn’t going to work out then I’d have to fall back on option B – eek!

Unpicking the waist seam and then the pleats in the lace took FOREVER.  The thread was the exact same colour, I thought I might go blind trying to see every stitch and distinguish it from the lace.  The weave of the lace was so open that I had to unpick each individual stitch.  I couldn’t rip out a few at a time or I risked tearing the lace.  Eventually I managed it and miraculously I managed to retain my sight and not tear the lace.  Whoop!

The next stage was to gather the waistline – straightforward, right?  Erm NO.  I sewed my two gathering lines and realised that the second one had accidentally crossed over the first in a careless mid-sewing swerve, so before I could even begin I had to unpick that line of stitches and redo it.  Once I had done that I set about pulling the threads to gather them only to find that the stitches weren’t long enough and the threads snapped!  I’d used a stitch length of 4 but it wasn’t enough!  So I had to start AGAIN.  This time I used a stitch length of 5 and thankfully it worked.

I used bias binding to bind the skirt and bodice seams together to make the waistline nice and neat on the inside.  I had used French seams for the side seams of the satin skirt and when I hemmed it, I used a bias binding facing hand sewn into place.  Both the overlay and the satin skirt are sewn together at the centre back zip because of the zip.  Here’s a close-up photo of some of the insides.

 Left: French seamed satin skirt
Top right: Bias bound waistline
Bottom right: Bias bound hem on the satin skirt

I had quite a bit of bother with the zip.  I ordered a ‘transparent’ concealed zip – the only type of zip available from White Tree Fabrics – designed to be ‘transparent’ so that you can use it with any fabric (Note from WhiteTree - larger zip selection coming soon!).  You’ll note the quotation marks I have employed because the zip is not so much ‘transparent’ as just…white.  As you sewists will know, it’s always tricky inserting an invisible zip especially if you have a bulky waistband to get past, and with the lace overlay added into the equation it did not go well!  The zip was showing and it was showing white.  To make matters worse, when I then tried on the garment, the zip pull got stuck at the bulky bit (despite me having snipped the corners to try to eliminate the bulk) and it wouldn’t move.  I had to unpick it and go and buy a standard dress red dress zip for the job!  I did a centred zip in the end, and the bulkiness of the seams means it stands out a bit, but I can live with it.  Especially when the alternative is to unpick it AGAIN and re-insert!

The Red Lace Dress – inside – front and back

I haven’t worn the dress yet as I am saving it for a dear friend’s wedding in October.  Obviously I had to try it on for a few quick photos though, to give you an idea of what it looks like on! I’m pleased with how it looks from the front, and from the side.

The back has a few issues – a bit of gaping in the upper back of the lace overlay.  On the dressmaker’s dummy if the top of the neckline sits high, it reduces the gape, but it doesn’t want to sit high when I’m actually wearing it.  What I’m going to do is to trim the neckline down a little lower to get rid of the excess from the top, and then re-finish the edges, and make a new button loop.  But that can wait until nearer to the wedding!

Talking of button loops, this was my first ever go at it and I was pleased with how it turned out and relieved it was easy to do.  I had to consult my 1972 Singer Sewing Book for instructions on how to do it!  Here’s a photo of the loop and also the blind hem I hand-sewed on the satin.  You guys know how much I hate hand-sewing so this deserves another photo!

If you’re still reading, congratulations on making it through such a long post and please accept my apologies: this dress took such a long time to get right and a lot of effort went into it so I like to give a full report!

I’m looking forward to wearing this to my friend’s wedding (once I’ve sorted the back gape).  Thanks to White Tree Fabrics for providing the fabric!  My next project with them is going to be super simple!

If you fancy tackling a project like this and having a go at making your own red lace dress, here's what you'll need:

The Red lace can be found ► here.

Find our duchess satin ► here.

Liquid lightweight satin is ► here.

Try this sewing pattern ► V8020.

Sew All Threads ► here.

0 Comments | Posted in Bloggers Creations By Lisa Washington

Guest Bloggers

Wednesday, 10 September 2025 17:07:47 Europe/London

The WhiteTree blogging family currently consists of 25 very talented ladies from all over the UK as well as having one blogger in the USA and one in Belgium! Some of our bloggers have a wealth of knowledge and experience to share, whilst some of our bloggers are new to sewing and are able to share their progress and sewing journey. Although our team is full to bursting with amazing ladies, we do have a few guest bloggers on board. We are working on very special projects with these lovely ladies....so we thought we'd introduce them to you!

   Jane                                                  Hannah                                             Maria


Jane blogs over at Handmade Jane. She's been sewing since 2009. She has a passion for all things Vintage, Gingham and Polka dots, as well as red blue and retro floral prints. With around 100 amazing makes on her website, I think it's safe to say that Jane will be bringing a wealth of experience with her and we can't wait to see how her project for WhiteTree turns out!

Hannah blogs over at Made with hugs and kisses. With around 40 makes under her belt, Hannah certainly knows how to turn out gorgeous dresses, lovely tops and pretty skirts. Her makes have a vintage feel to some of them; all are feminine and beautifully cut and made. Hannah is helping up with a truly special project and we know it's going to be a great blog post! Stay tuned.

Maria blogs over at How good is that? Maria's blog is well established and well loved and was recently nominated for a Burda style blog award....that's how good it is! Maria hails from Sydney, Australia. She can turn her hand to making any garment; tops, trousers, coats, skirts, dresses.....and we've got something special in the bag for her project with us! We can't wait to share it with you all.

Keep your eyes peeled for these projects coming up and we hope you'll join us in giving our lovely guest bloggers a warm welcome.

What is a guest blogger?
Rather than being a regular, monthly contributer, we will work with certain bloggers on special projects a few times a year. Interested? Contact Lisa to discuss this option further. We aren't currently taking on any more regular bloggers because the response was so overwhelmingly wonderful that we managed to fill our places in around a month!

Comments | Posted in WhiteTree Blog Team By Lisa Washington

Lucie's Honeymoon Hold all bag

Wednesday, 10 September 2025 15:15:43 Europe/London

You may recall that back in July, Lucie created some wonderful, bespoke clutch bags for her upcoming wedding....and they turned out beautifully.

For her next project, Lucie turned her attention to her upcoming honeymoon and decided to create another bag, but this time, one that was a bit larger and would hold more than a lippy and some tissues! The result is a gorgeous, versatile, really pretty but practical shoulder bag fit for any honeymooner! Over to Lucie.

Do you like my new bag? ‘It’s white!’ I hear you cry.

I would never buy a white bag but making one that I know I can wash is another matter. Anyway I needed a nice roomy packable bag to take me to lunch whilst on honeymoon. And if you can’t be flippant on honeymoon, when can you be?

Isn’t the fabric fabulous? It is a white bonded lace, courtesy of White Tree Fabrics. Basically it is a lace that is already bonded onto a satin back. So instead of you layering two fabrics together as I did for my wedding handbag it is done for you. This makes the fabric incredibly stable. As easy as sewing cotton. This fabric would make an incredibly cute 60’s shift dress. I might just have time to fit one in the 8 week count down to our trip. The pattern for the bag came from "Bags, the modern classics" by Sue Kim. Don’t be surprised if you see a few more makes from this book! I plan on making the front cover clutch bag next. This one was incredibly simple.

Details of above:

Simple pattern all laid out.
2 cut of the exterior fabric, 2 of the lining, 2 fusible medium weight interfacing, 2 heavy weight sewn in interfacing.
Magnetic clasp easily attached through a little square of medium weight interfacing.
A dear little pocket.

We really love this bag! If you do too, here are the details of what Lucie used to make it.

White bonded 2-in-1 lace ► here.

Additional satin lining ► here.

Comments | Posted in Bloggers Creations By Lisa Washington
per page
Items 1 to 10 of 52 total
1 2 3 4 5
shop by categories